Braids can never go out of fashion, be it in the 70s or 80s, or 90s, every time they come up with new techniques or styles but the base hair braiding is the same. One such style is a French braid which looks very elegant and is very easy to make. Here are the steps you need to follow if you are looking for How to French Braid.

Image Credit : Jodie Coetzie
Table of Contents
Things that will help you:
- A comb
- A hair tie
- Bobby pins
- A hairspray (optional)
Step 1:
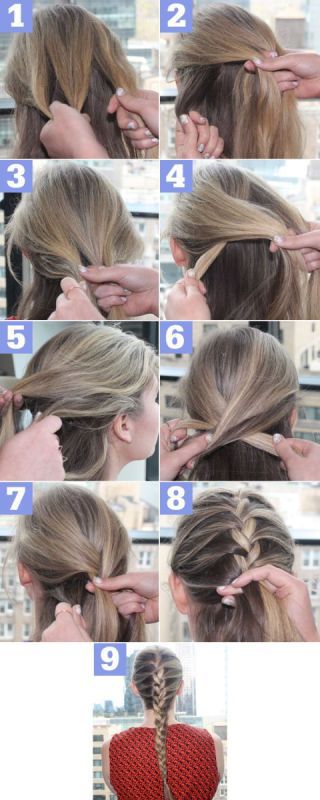
Start off by brushing your hair gently to make it smooth and detangled. Then, grab a chunk of hair from the front using your fingers just like you are making a puff.

Image Credit : Seventeen.com
Step 2:
Divide this section into three even parts as now you have to start braiding. So, start braiding normally.
Braiding simply is overlapping the side strand one by one on the middle strand.
Step 3:
While braiding, each time you cross a section from one side, take a chunk of the strand from the same side and add it to the braid and repeat the same from another side too. Make sure to take a balanced amount of hair strands to not make it look uneven.
Step 4:
As you go down braiding, all the leftover hair strands should be incorporated into the main braid and there should be no hair left. By the time you reach where no hair strand is left, start braiding normally after then. Braid till the end and left some portion at the end and tie it with a hair tie.
Secure with bobby pins wherever required. Use hairspray if you feel a need to use it.
That’s it, an easy-peasy French braid is ready.
You can watch this nifty youtube as well!
More Hairstyling?
- 5 Easy Hairstyles for College !
- Hairstyles that Make You Look Older !
- Causes And Remedies For Skin Pigmentation Around The Mouth

5 comments
cool one…
Helpful and thorough tutorial..
Loved it :rose:
I am obsessed with French Braid hairstyles these days :haanji :haanji
Thanks for this detailed description. Now I can happily make a perfect french braid! :balleballe
Thanks :love :love